CS210 Lab: Libraries and Running Time Measurement
Prelab Questions:
For a review of relevant topics click
here.
Highlights of This Lab:
Lab Exercise:

Click the little computer above for a detailed description.
In the exercise,
the students can add the library, which has been created in this lab,
to existing code to test the runtime of three different search algorithms
and three different sorting algorithms.
1. Running Time Measurements
A routine's performance can be judged in many ways. In CS210, you have
been/will be learning Big Oh. The idea is that you can estimate the
routine's projected execution times as a function of the number of data items
(N) that it manipulates as it performs its task. The results are estimates of
the form O(N), O(LogN) and so on.
Big Oh allows us to group routines based on their projected performance
under different conditions (best case, worst case, etc). Remember that
Big Oh is only an estimate. It does not take into account factors
specific to a particular environment, such the specific implementation,
the type of computer system we are using, and the data that we are
processing.
To determine how well or poorly a routine will perform in a particular
environment, we need to evaluate the routine in that environment.
In "Part 1" of the laboratory exercise,
you will measure the performance of three
search routines:
- binarySearch()
- linearSearch()
- unknownSearch()
The first two search routines were discussed in CS170.
For a review, click
here
In summary, for the binary search, you are given a sorted array.
The idea is to divide the array into two equal parts and narrow down the
range of the array to be searched either to the low part of the array or
high part of the array. We will continue narrowing down the range until
the value is located, or until we realize that the value searched
for is not in the array.
The linear search is also known as the sequential search.
The idea is start with the first element, and sequentially search through the
array until we find a match.
Before we can measure the performance of these routines, we must first
develop a set of tools that allow us to measure the execution time.
The general approach will be the following:
- Get the current system time (startTime)
- Execute the routine
- Get the current system time (stopTime)
- Calculate the routines's
execution time=stopTime-startTime
If the routine executes very rapidly, then the difference between
startTime and stopTime may be too small for your
computer system to measure. If that is the case, we can execute the
routine several times (say n) and then divide the resulting
time by the number of repetions (n) as follows:
- Get the current system time (startTime)
- Execute the routine n times
- Get the current system time (stopTime)
- Calculate the routines's execution time =
(stopTime-startTime)/n
To capture the startTime and stopTime, we will
use a class called Timer which has the following member functions:
- start()
- stop()
- getElapsedTime()
To add some complexity to this lab, we will turn this Timer class
into a library and use this library for the lab exercise at the end.
2. Creating a Library and Using it
Our first step will be to download the Timer class and a
sample program just to try it out
2.1 Download the C++ programs
Transfer three files to your local PC (C:\Workarea). Get the files from
ftp://ftp.cs.uregina.ca/pub/class/210/ftp/Library
The three files are :
- complexity.cpp:
|
This is the main program. |
- timer.cpp:
|
This is the implementation of the Timer module.
It can be compiled into a library once it is bug-free. |
- timer.h:
|
This is the header file of the Timer
module |
This is where you should store the three files in your
local PC:
C:\Workarea
2.2 Compile the C++ programs
Using the procedures discussed in Lab 1
do the following:
- create a new project called labtst
- add the three files to this project
- build and execute this project
Let's have a look at this code:
- timer.h and timer.cpp are useful for
calculating the running time measurements.
Because we may want to use the class Timer over and over again,
we may want to put it in a library.
Our second step will be to create a library
2.3 What is a library?
A library is a collection of functions or classes. Unlike
an object file, a library file stores each function or class, individually.
When your program references a function or class contained in a library,
it links that function or class and adds its code to your program. This
way only functions or classes that you actually use in your program are
added to the executable file.
2.4 What are header files?
Each function or class defined in the C or C++ standard library has a
header file associated with it. The header files that relate to
the functions that you use in your programs should be
included (using #include) in your program.
There are
two reasons for this:
- to get the data types that work with many functions or classes in
the standard library. Your program must have access to these
data types that are defined in the header file related to each
function or class
- to obtain the prototypes for the standard library functions
2.5 Why create your own Library
Libraries can be regarded as pre-compiled functions or classes that do not
need to be re-compiled if other parts of your project change.
If you have a "bug-free"
module (a piece of self-contained code) that could
be reused with other projects, you can compile this module to a library.
After you link this library to your new project, you will then
be able to use any of the functions or classes in this library as
if they are defined locally in your project.
One major advantage is that the functions or classes in the library
will not be recompiled, which saves time compiling your entire project.
In our example, "timer" is a perfect candidate: it does not contain any bugs
and we can use it again in other projects.
To use "timer" in a new project, we will have to first compile the C++
programs into a library, and then link this library to the new project.
2.6 Compile the C++ programs using a library.
In this program, timer.h and timer.cpp
define and implement a time measuring class Timer. This
class is independent of the kind of program it is
measuring. In other words, we can reuse this Timer class to
measure the running time of other programs. It naturally follows
that once we make this class bug-free, we can compile it
into a library. To use this time-measuring class,
we simply include the header file (i.e.timer.h)
in the program and link the library to this program.
The following shows you how we do this:
Step 1. Create the library
- Start Microsoft Visual Studio .NET
- Choose File->New->Project...
- A "New Project" Dialogue box will appear
- Expand the "Visual C++ Projects" folder and
select the "Win32" sub folder
- From the "Templates" pane, select "Win32 Console
Project"
- Name: mylibrary
- Location:C:\Workarea
- Click OK
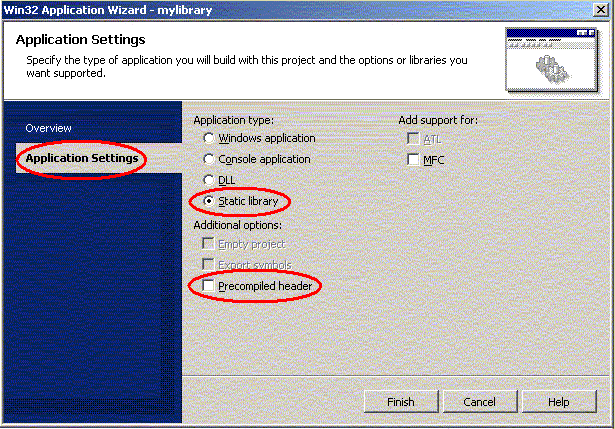
- The "Win32 Application Wizard" Dialogue box will appear (see the
below picture)
- Under Application Settings, choose Static
library
- Uncheck Precompiled header
Step 2. Add the necessary files to mylibrary and
build the library
- Copy the files timer.cpp and timer.h into
the mylibrary directory
- Choose Project->Add Existing Item...
- Highlight timer.cpp and timer.h
- Click Open
Step 3. Build mylibrary
- Select Build->Build mylibrary
The following message should be displayed in the output area:
------ Build started: Project: mylibrary, Configuration: Debug Win32 ------
Compiling...
timer.cpp
Creating
library...
Build log was saved at "file://C:\Workarea\mylibrary\Debug\BuildLog.htm"
mylibrary - 0 error(s), 0 warning(s)
---------------------- Done ----------------------
Build: 1 succeeded, 0 failed, 0 skipped
The library should be stored in C:\Workarea\mylibrary\Debug
Step 4. Link the library to your project
- Choose File->New->Project...
- A "New Project" Dialogue box will appear
- Expand the "Visual C++ Projects" folder and
select the "Win32" sub folder
- From the "Templates" pane select "Win32 Console
Project"
- Name: lab5
- Click OK
- In the "Win32 Application Wizard" Dialogue box, select
Application Settings, and check Empty project
- Copy complexity.cpp
into
the lab5 directory (you do not need to add
timer.cpp, since you have already compiled it
into a library)
- Choose Project->Add Existing Item...
- Highlight complexity.cpp
, then
click Open
You now have to do three things to add the library that you created to the
"link line".
- Add mylibrary.lib to the Project Properties
- From the main menu, select:
Project->Properties
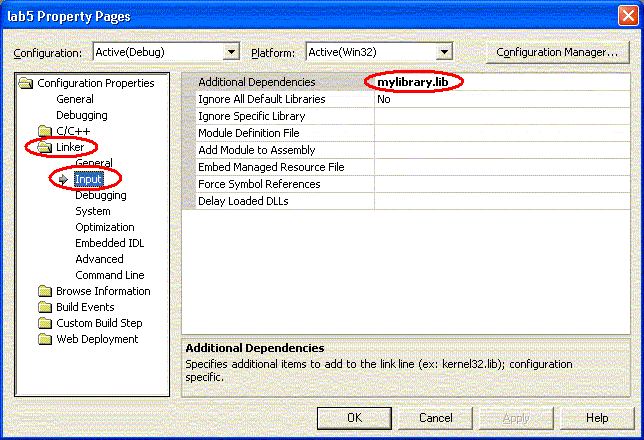
- A "lab5 Property Pages" Dialogue Box should
be displayed (as shown below)
- Expand the Linker folder and select
the Input subcategory
- Click on the "Additional Dependencies" on the
right-hand side and type: mylibrary.lib
- Add the corresponding path (or location of this library) to the
project. The path is used to locate the library files when the
VC++ project is being built.
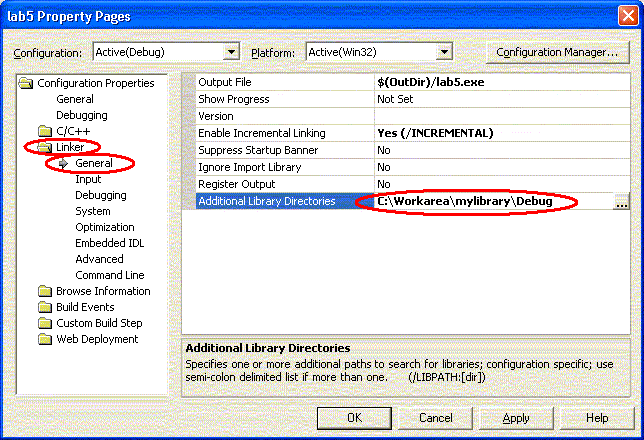
- In the "lab5 Property Pages", under the expanded
Linker folder select the General
subcategory.
- Click on the "Additional Library Directories"
on the right-hand side and type:
"C:\Workarea\mylibrary\Debug"
(the location where the mylibrary.lib can be
found)
- Add the path where the timer.h file is to be found.
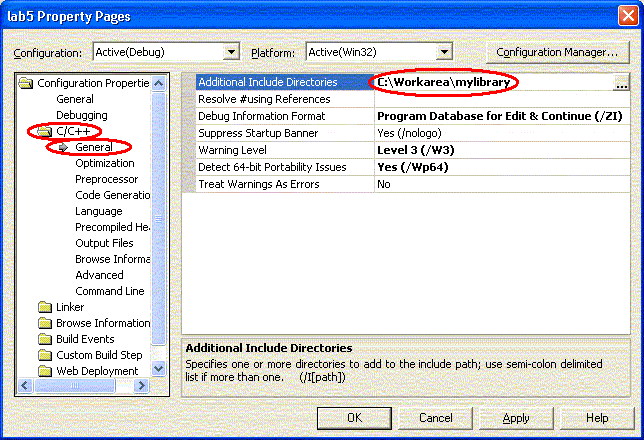
- Again, in the "lab5 Property Pages" dialog,
expand the C/C++ folder.
- Select the subcategory General and
click on "Additional Include Directories".
- Type in:
"C:\Workarea\mylibrary\"
You should see the following output if you have followed the
above steps correctly.
Select Build->Build lab5
------ Build started: Project: lab5, Configuration: Debug Win32 ------
Compiling...
complexity.cpp
Linking...
Build log was saved at "file://c:\Workarea\lab5\Debug\BuildLog.htm"
lab5 - 0 error(s), 0 warning(s)
---------------------- Done ----------------------
Build: 1 succeeded, 0 failed, 0 skipped
Finally, click on Debug->Start Without Debugging to run
your program.
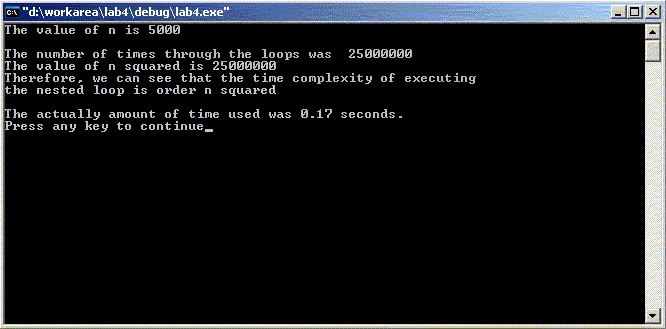
Your output should look like the following:
Note: the above instructions only change the settings of your current project.
If you want to use the library multiply times, it might be good to adjust a
more global setting so that the linker will know where to find the library
for any future projects. The following steps outline how to adjust the more
global settings:
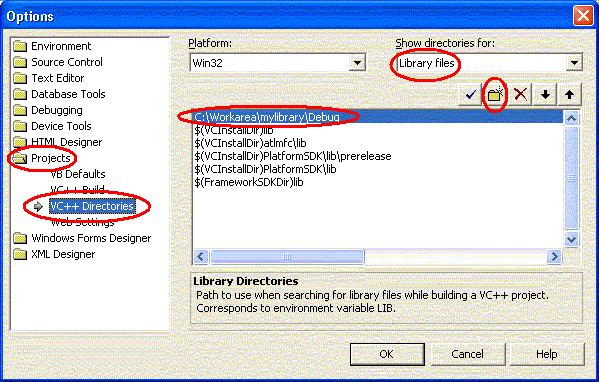
- From the main menu, select:
Tools->Options
- An "Options" Dialogue Box should appear (as shown
below)
- Expand the Projects folder and select
the VC++ Directories subcategory
- In the drop down menu titled "Show directories for:"
select Library Files
- Click on the "New Line" icon to insert a new line.
Then, type: "C:\Workarea\mylibrary\Debug"
(the location where the mylibrary.lib can be
found)
- Repeat the above two steps for the *.h file:
In the drop down menu titled "Show directories for:"
select Include files and add
"C:\Workarea\mylibrary" as the path
- Click OK
|
3. Lab Exercise
You will plot the
execution times of three searching routines.
- Get the files:
Click here
To get the zipped files for this exercise
- Extract all of the files to the WORKAREA.
There are three files used in this program:
- search.cpp
contains the implementation of a set of searching
routines.
- sort.cpp
contains the implementation of a set of sorting
routines (used to sort the array so that binary
search will work).
- timesrch.cpp -- the main program.
Outputs the runtime of the three searching routines.
Your primary tasks for this exercise are:
- Create a normal C++ Win32 Console Project using the three files.
- Include the timer library into this program.
- Compare the execution times of the three searching routines.
Steps include:
-
Adjust the project properties to link to "mylibrary".
Don't forget the three steps:
- Add mylibray.lib to the "Additional Dependencies"
- Tell it where to find the mylibrary.lib
(The setting is in the Property Pages,
under Linker->General)
- Tell it where to find the timer.h file
(The setting is in the Property Pages,
under C/C++->General)
-
Compile and run the project. You will notice that the values are printed in
the following format:
Enter the number of keys : 1000


     Sort     | Number of |  Total Time  |   Time  per
     Type     |   Sorts   |     (s)      |    Sort(s)
--------------|-----------|--------------|--------------
Selection sort|       1700|    3.093e+000|    1.819e-003
QuickSort     |      14000|    2.922e+000|    2.087e-004
unknown sort  |        500|    2.781e+000|    5.562e-003
Press any key to continue
The 2.087e-004 is equivalent to 2.087*10-4 or 0.000002087.
-
Fill in the handout provided by your instructor.
This involves plotting the time that it takes to run the three
algorithms with different numbers of keys.
In the end, you will have three lines for the three searches:
linear, binary, and unknown.
Suggestion: The increments for the "Search time" axis have been left up to
you. First, write everthing as 10-6 seconds.
Then, create six tick marks along the y-axis: 3, 6, 9, 12, 15, and 18.
Part 2
- Get the files:
Click here
To get the zipped files for this exercise
- Extract all of the files to the WORKAREA.
There are two files used in this program:
- sort.cpp
contains the implementation of a set of sorting
routines (including selectionSort(), quickSort(),
and unknownSort())
- timesort.cpp -- the main program.
Outputs the runtime of the three sorting routines.
Your primary tasks for this exercise are:
- Create a normal C++ Win32 Console Project using the two files.
- Include the timer library into this program.
- Compare the execution times of the three sorting routines.
-
Follow the steps outlined in Part 1 and complete the handout provided by your
instructor.
Suggestion: The increments for the "Search time" axis have been left up to
you. First, write everthing as 10-3 seconds.
Then, create ten tick marks along the y-axis:
10, 20, 30, 40, 50, 60, 70, 80, 90, 100.
4. Postlab Exercises
For postlab exercices, click here.
This page last modified by Nova Scheidt:
[an error occurred while processing this directive]
|
Accessed
 times. times.
|
 Copyright: Department of Computer Science, University of Regina.